Works module
Features
- Organize artworks (paintings, sculptures, photographs, videos, etc.).
- Several image formats supported.
- Insert video files.
- Image resizing.
- Send images via E-Mail.
- Numerous print templates, A4, catalogs, certificates of authenticity, labels.
- Individual or batch images exporting.
- Customizable print templates.
Add copies of a work
Works module is designed to contain information about unique artworks such as paintings, as well as works existing in several copies (photographs, engravings, etc.). When you create a new record, the field Edition is set by default to 1. If the artwork includes several copies, enter their number in the Edition field. The Works module window will switch instantly to the layout which includes the multiple edition table.
Important: Remember to set a unique reference for each copy. Setting Edition and Reference fields is imperative.
To add several copies of the same work, proceed as follows:
- Go to Record display by clicking the Record tab.
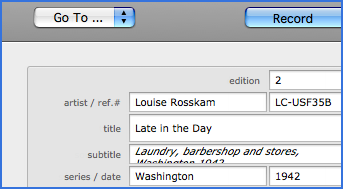
- Indicate the number of copies in Edition (see figure 1 below).
- Enter a unique reference in the Reference field.
- In the table of copies, set the fields of the first copy: No, Reference, Medium, etc.
- Note that the copy reference is composed by work reference, followed by copy order number and edition number (ref-1/edition). The copy reference can also be set manually.
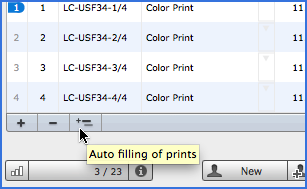
- At the bottom of the table of copies, click the
 button (see figure 2 below) to add as much copies as it is needed. The copy created will take the information (medium, size, location, availability, prices and signature) of the previous.
Auto filling of copies
It is possible to automate the filling of copies (prints) if you do not want to do it manually:
- Just fill in the information of the first copy as described in the previous paragraph.
- Click the button
 Auto filling of prints (see figure 2 below).
 - The remaining rows will contain the data of the first copy. If you need, modify the reference fields.
Insert images
Each of works can be represented by three images. This may be useful in the management of sculptures and installations. Image fields can also accept other multimedia files such as videos. Click here to see the list of supported formats, and to see two different methods for insertion of images. Images can also be imported by folder. This action is featured in the chapter Importing data.
Insert an image by clicking the Insert button. This button is located below the field for the images. View the image in full size by clicking on![]() Increase Window. The images you insert are automatically resized if their original size exceed the parameters defined in User Preferences -> Options -> Works -> Automatically resize inserted images (700 x 700 pixels by default). If you do not want the images to be resized, uncheck Automatically resize inserted images. You can always do this manually. Note that images inserted as links are not affected by the automatic resizing as they are stored outside the database.
Increase Window. The images you insert are automatically resized if their original size exceed the parameters defined in User Preferences -> Options -> Works -> Automatically resize inserted images (700 x 700 pixels by default). If you do not want the images to be resized, uncheck Automatically resize inserted images. You can always do this manually. Note that images inserted as links are not affected by the automatic resizing as they are stored outside the database.
To modify the parameters of the automatic resizing, go to View -> Go to ... -> User Preferences in the menu bar, select the Options tab then Works, and click Automatically resize inserted images. In the window that appears, enter values for Width and Height and click OK.
Special menus
Works module is equipped with some special menus.
Dropdown menu Choose Action in Record Mode
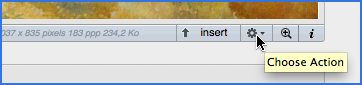
In Record Display Mode, between the buttons Insert and![]() Increase Window (see image below) you will find the dropdown menu
Increase Window (see image below) you will find the dropdown menu![]() Choose Action that gives you access to commands:
Choose Action that gives you access to commands:
- Add to Event - adds the works to the current event. If the Events window is closed, the work will be added to the last event created.
- Full Screen - Displays the image in full screen during the time (in seconds) that you have defined. Exit the full screen with Esc.
- Resize Image - Displays a resizing dialog box.
- Send by E-Mail - Launches your e-mail client by creating a message with the image and information about the work.
- Swap title and subtitle
Dropdown menuChoose Action in List Mode
In List Display Mode, the dropdown menu![]() Choose Action will be found at the bottom right corner of the window. This menu provides access to the following:
Choose Action will be found at the bottom right corner of the window. This menu provides access to the following:
- Add Found Set to Event - Adds the works found after performing a search action to the active event.
- Add Selected to Event - Adds the works marked to the active event. If the Events window is closed, the works will be added to the last event created.
- Mark All Records - Check the checkbox
 of records found.
 - Show All Records
- Show Editions - Displays the list of all editions. Editions can also be displayed by clicking Works in the main menu while pressing the Alt key on your keyboard.
- Show only marked records - Displays records where the checkbox is checked.
- Unmark All Records - Uncheck the box of records found. Hidden records are not affected by this action.
Menu Other...
To access this menu you need to view Works, then go to Records -> Other... in the menu bar.
- Find the artist on ArtNet - Search Artist in the directory of the ArtNet including (or not) the title of the work.
- Convert Measurement Units (cm) - Converts cm to inches in all found records.
- Convert Measurement Units (inches) - Converts inches to cm in all found records.
- Regenerate Thumbnails - Regenerates thumbnails if they are not displayed properly in List mode.
- Reduce The Size of All Images - Resizes images in all found records with the values you set.
- Find Images by Size - Allows you to find images with the weight in KB (kilobytes) that exceeds the defined value.
- Export Image - Exports the clicked image to the location of your choice.
- Export All Images - Exports found images to the location of your choice.
- Delete Image - Deletes the clicked image. You can execute the same action by pressing Delete key on your keyboard.
Show additional information
The Works module, like Events and Invoicing, has a side area with additional information. This area consists of three "accordion" tabs.
- Additional information - Contains a table Other... for adding custom fields.
- Production Information - Contains a table of production costs. By clicking on Price (underlined, blue), the total cost of production is added to the selling price. The Commission field represents the commission charged by the gallery on the selling price. Here is also present a table Events that displays events related to the work.
- Acquisition Information - Contains a table Location History.
 Advice on use
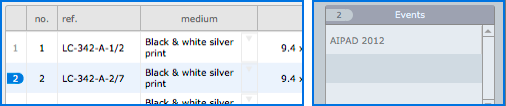
In the case where the work is published in multiple copies, you must click on the row of the copy to display corresponding additional information (see figure below). When entering this information, confirm your entry by clicking constantly outside items to refresh the data.
Customizable print templates
This module includes custom print templates. See the Printing chapter for more details.
Print Options
When printing in Works module, you can choose the information to appear. These options can be managed via the User Preferences panel or just before you print. See the Printing chapter for more details.