Address Book module
Features
- Entering contacts information that are automatically shared with other modules.
- Insertion of a photo (62x70 pixels) per contact.
- Access to the contact website (internet connection required).
- Displaying map in Google Maps (internet connection required).
- Printing of contacts' names with complete addresses in form of a list.
- Printing of contacts as mailing labels (available shapes: 2x8 and 3x8).
- Sending e-mail messages to one or more contacts (email merge).
- Creation and printing of letters with mailing functions.
- Archiving of sent mail for later consultation.
- Importing addresses from other programs.
- Exporting addresses to other programs.
General information
The drop down menu Choose Action![]() is placed, in record view, at the bottom right of the contact picture, in list view, at the bottom right of the main window. The content of this menu depends on the display mode.
is placed, in record view, at the bottom right of the contact picture, in list view, at the bottom right of the main window. The content of this menu depends on the display mode.
The content of the menu Choose Action![]() in record view:
in record view:
- Add to Recipient List - Adds a contact to the active recipient list (see Mail section below on this page).
- Change the Address Format - Formats addresses by country.
- Change the Label Color - Displays the color picker to change the color of the label
 .
. - Map Off (Google Maps) - shows the contact addresses on Google Maps.
- Swap primary and secondary addresses
The content of the menu Choose Action![]() in list view:
in list view:
- Add found set to Recipient List - Adds the contacts in the found set of records to the active recipient list.
- Add selection to Recipient List - See point 1 of the preceding paragraph.
- Change the color of checked labels - Changes the color of the labels which the Mark/Unmark checkbox
 is checked.
 - Change the color of current label - See point 3 of the preceding paragraph.
- Change the color of found labels - Changes the color of all labels in the found set of records.
- Display only marked records - Displays records where the Mark/Unmark checkbox is checked.
- Mark All Records - Checks the checkbox of all records or of the found set of records, if executed after a find action.
- Show All Records
- Unmark All Records - Unchecks the checkbox of all records or of the found set of records if executed after a find action.
- Invoices tab includes bills related to a contact.*
- Mail tab contains archived mail sent to a contact.*
- Interest
 tab allows you to insert custom fields.
* Double-click the row displaying related information to open it in the original module.
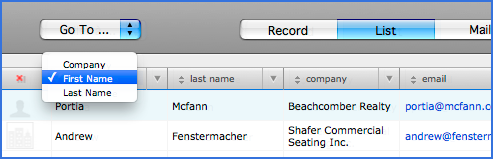
In list view, you can choose the content of the items by clicking on the icon ![]() placed in front of his name (see figure below). You can swap the first three items First Name, Last Name and Company, and display content between Main Address, Email, Focus, Notes and Phone Numbers in the fourth.
placed in front of his name (see figure below). You can swap the first three items First Name, Last Name and Company, and display content between Main Address, Email, Focus, Notes and Phone Numbers in the fourth.
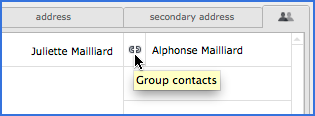
If two or more contacts have the same address, this icon ![]() appears instead of this one
appears instead of this one ![]() (see figure 1 below). This means you can display these two contacts together (see figure 2 below). This is useful if you wish to send the same invitation to a couple, or if two different persons must appear on the same invoice. To link two contacts, click the Group contacts icon
(see figure 1 below). This means you can display these two contacts together (see figure 2 below). This is useful if you wish to send the same invitation to a couple, or if two different persons must appear on the same invoice. To link two contacts, click the Group contacts icon ![]() (see figure 1 below).
(see figure 1 below).
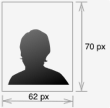 Since version 2.0.6, the image is automatically resized to fit the field (62 x 70 pixels). The images smaller than this size are not processed.
To insert the image, double-click the photo section in the record display mode. An insertion dialog window allows you to select the image on your computer. Insertion can also be done by drag and drop.
Mailing
The mailing window gives you access to four tabs:
- Email - Sending a message to the current contact.
- Email Merge - Sending a message to a group of contacts.
- Mail - Writing a letter to the active contact.
- Mail Merge - Writing a letter to the all found contacts.
The use of Email, Mail and Mail Merge being rather intuitive, we detail below the use of Email Merge. This feature allows to create personalized emails that are intended to a group of contacts.
- Click Address Book -> Mailing -> Email Merge.
- First, create a new mailing list by clicking the button
 New List (see image below).
 - In the Address Book table (on the left side), select the wanted contact and click the button ->Add. If the email is missing or invalid, the contact will not be added into the list of recipients. It is also possible to add contacts to the list from record and list view via the drop-down menu Choose Action
 (see Choose Action paragraph).
 - Remove a contact by clicking the button
 Remove.
 - Click the button ->Add All to add all the contacts to the list.
- After completing the list, go to Message tab.
- Enter the subject, the text of the message and, alternatively, any attachments.
- Click Send. The messages will be send using your default email client* or directly, if the SMTP Server option is selected in User Preferences -> General tab.
* Depending on what email application you use, sent emails will be stored in the Outgoing Mailbox or send without any warning. It will be the case if you use Mail under Mac OS X. Considering the growing number of email clients and differences brought by each update within the same software, we could not predict exactly the behavior of this action. All your suggestions on this subject will be welcomed. However, we advise you to define Outlook under Windows and Entourage under Mac OS X as default email application, even if you are using another software for your email.

In order to not saturate your outgoing mail server and in case you have a large number of contacts, it is preferable to group them into several lists. You can create as many lists as you like and call them via the drop-down menu Choose List. A mailing list can be removed (button![]() ), duplicated (
), duplicated (![]() ) or exported (
) or exported (![]() ) to be used in another e-mail software.
) to be used in another e-mail software.
 Advice on use
If you have to announce an important artistic event and you wish to give your message a professional aspect, it would be judicious to prepare all the elements of your announces, (text and images), into the same document and save it as PDF. You can attach this document to your message but you need to leave the text field in your email empty. If your PDF document do not exceed single page, it will appear "full screen" in most recent email clients, and not as an attachment icon.
Before sending merged email messages, test it initially with, as recipients, yourself and your close entourage.
Preferences
Contacts can be displayed by First Name/Last Name order or by Last Name/First Name order, according to your working custom. To do this:
- Go to View -> Go to -> User Settings on the menu bar.
- Click Options tab and then click Address Book tab.
- Select Arrange Contacts by First Name/Last Name order or Arrange Contacts by Last Name/First Name order.
If no last name or first name is indicated, the contact will be displayed by company.
Customizable print templates
This module can have custom print templates. See the Printing chapter for more details.
Print Options
When you start printing by clicking Print, you can choose, in the following dialog box, the items you wish to appear in the print templates by clicking the Options button. The customized print templates are not affected by this function.