Windows
Installation and launching under Windows
To install vGallery on Windows, run vgallery-v2.exe and let the setup program guide you. The default installation directory is My Documents (Windows XP) or Documents (Windows Vista and higher). The full paths to the Documents directories are:
- C:\Documents and Settings\Your account name\My documents (Windows XP).
- C:\Users\Your account name\Documents (Windows Vista and higher).
The setup program let you choose another location for installing vGallery. Choose, if you can, a local disk with good storage capacity. If you are using Windows Vista or higher, please read carefully the following note:
WINDOWS VISTA AND HIGHER : To install vGallery on Windows Vista or higher if UAC security system is activated (see chapter Troubleshooting), choose, as install location, another directory than Program Files or Programs.
Very important: Some vGallery features use Microsoft .NET Framework 3.5 SP1. If this Windows component is not detected on your computer, installation wizard will offer to download and install it before starting to install vGallery.
Uninstalling under Windows
Uninstall vGallery via Add/Remove Programs in the Control Panel. If the uninstall process is incomplete, which may happen if you have added other elements to the application folder, you must manually remove the vGallery folder by sending it to the Recycle Bin.
Mac Os
Installing and launching under Mac OS
- To begin installation, first open vgallery-v2.dmg.
- Double-click vGallery Installer file and follow onscreen instructions. At the end of the installation process, the folder containing vGallery and its documentation will be open.
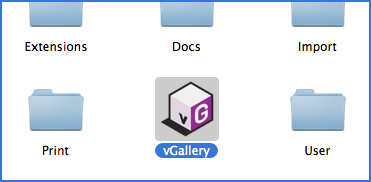
- Launch the program by double-clicking the vGallery icon inside vGallery v2 folder (see figure below). We recommend that you place vGallery icon on the Dock or create an alias on the desktop, which will allow you to quickly launch the program.
Uninstalling under Mac OS
To uninstall vGallery under Mac Os, highlight the vGallery folder, send it to Trash, and then empty Trash.
iOs (iPad)
To run on iPad, vGallery requires 12 FileMaker Go for iPad. This app is available for free on the App Store. Once FileMaker Go 12 for iPad installed, you have two possibilities to use vGallery: copy the database file in FileMaker Go, if you are using vGallery on a single computer, or open it remotely if you are working in a network.
Installing and launching of the standalone version (single-user)
- Connect your iPad to the computer on which you have installed vGallery.
- Launch iTunes. If you do not have iTunes installed on your computer, download it from http://www.apple.com and install.
- In iTunes window click the name of your iPad then go to Apps menu.
- Scroll down to File Sharing.
- There are two columns: Apps and Documents.
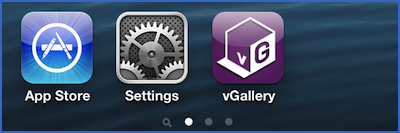
- Under Apps, click FileMaker Go (see the screen capture below).
- Drop the database.vg2 and valuelists.vg2 files from vGallery folder on your computer to FileMaker Go Documents column in iTunes.
Under Windows, vGallery is installed by default in My Documents (Documents in Windows 7 and later). Under Mac Os, it's installed in Applications folder.
You can also click the Add... button and browse to files you wish to add to FileMaker Go.

To launch vGallery on iPad, you have two possibilities: run FileMaker Go and open database.vg2 via Open File Browser... -> Files on Device,
or create a launcher for vGallery as shown in the screenshot below.
To create your own launcher of vGallery, follow these steps:
- In vGallery, go to File -> Send and select vGallery Launcher for iPad (standalone or remote).
- Send the launcher by email to yourself or your associates.
- Check this email on your iPad and open the attachment named vGallery.mobileconfig.
- In the next window click Install. A new vGallery icon will appear on the iPad's screen.
Installing and launching from network
- Install FileMaker Go on iPad.
- Open FileMaker Go and click Open File Browser...
- If your iPad is connected to your LAN, click the Local Network Hosts menu, and then click the name of your network.
- Click database file to launch vGallery.
- If vGallery is hosted on a remote server, you need to know and add its IP address to Favorite Hosts using the Add Host... button.
- When the name of your server will appear in Favorite Hosts, select it then click database file.
Files opened at least once, are available in the Recent Files menu.
vGallery can be installed on the iPhone the same way, but as the benefit of such use is limited there is no appropriate interface.
The Update and The Upgrade
An update brings minor changes and repair some bugs. vGallery searches automatically for available updates when launched. In case you are using vGallery via local network, the research and installing updates can only be done on the computer that hosts the software. When an update is available, the Update panel opens automatically and propose you to download and install the update. Follow the instructions on the screen until the end of the procedure.
You need to relaunch vGallery to complete the update process.
If vGallery fails to find updates, check the status of your internet connection, verify if a firewall does not prevent it from connecting to the network and if the option Automatically check for available updates is checked. Note that the updates are free.
An upgrade is a new version of the software, bringing major changes. For example, vGallery v2 is an upgrade of vGallery. Apart from exceptional cases, there's a fee for upgrade the software. They are announced on our website or by email.